

Product Review
View larger
What Is A Capacitor?
A capacitor is a passive two terminal electrical component (a component that consumes but does not produce energy). In building a sound system for your car, you would want to use a capacitor for a couple of different reasons.
Why Do I need One?
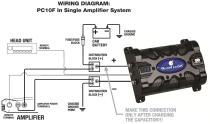
The main reason a capacitor is recommended is for power reserve. The capacitor stores energy and releases it very quickly to the amplifier(s). How does this help? It's very simple: Music is dynamic, no matter what type you listen to. The dynamics in musical content can very quickly transition from soft voices to thundering bass notes. These moments are where the benefit of having a capacitor is heard. The amplifier requires a constant amount of steady power to function efficiently and power the speakers. A capacitor will keep the power going to the amplifier consistent and stabilized, which means a better sounding system. Important: The remote output of the head unit is connected to the remote turn on of the capacitor. The capacitor will not function if the remote wire is not connected to your head unit.
Specifications
- Three digit, spuer bright blue LED voltage meter
- Voltage measurement accurate to +/- 0.1VDC
- Blue illuminated window
- Warning tones for the following conditions: Reverse polarity connection, over voltage limit (above 17VDC), and low battery voltage (below 10VDC)
- Capacitance (microfarads): 10,000,000
- Working voltage: 16VCD
- Surge voltage: 24VDC
- ESR (equivalent series resistance): 0.015 Ohm @ 120Hz/25ºC
- Capacitance tolerance: +/- 10%
- Dimensions: 9-5/16" x 7-/16" x 2-11/16"
View larger
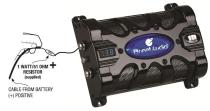
Charging The Capacitor
First, make sure that all the connections according to the diagrams in the instruction manual are correct. Pick up the cable coming from the positive (+) battery terminal. Place the supplied charging resistor between the end of this cable and the positive terminal of the capacitor. The capacitor will begin charging. Charging generally takes five to 60 seconds. During charging, the voltage shown in the three digit display will rise rapidly, then slow as it approaches the voltage of your vehicle's battery. When fully charged, the display voltage will stop rising. If you have a voltmeter, you can first measure the voltage of your car battery. Then you will know with accuracy that the capacitor is fully charged. Caution: During charging, the resistor will become hot. This is normal, but exercise caution during the charging process. After charging is complete, remove the resistor from the incoming positive cable, and immediately connect it to the positive terminal of the capacitor.


